Last month we asked you to vote for your favorite entry from our first annual AU Dynamo Hackathon. The votes are in and we’re excited to announce the winner: Acoustamo: Designed by Sound, by Andrea Vannini and Michael Hudson. Read on to learn about the project directly from the winners.
Project Intent
We set out to design an acoustic performance space that can self-adapt to a certain sound requirements.
Traditionally, during the conceptual design stage, the designer has to make assumptions about what the shape needs to be to satisfy a defined performance. The initial design can change drastically after this stage, and this approach is described as top-down. Using Dynamo and Optimo, it is possible to reverse this and create a bottom-up process. Once the constraints and the performance requirements are defined, the machine evolves the solution. The designer can then accept or refuse the results, which could range from fairly obvious to innovative.
Raytrace and Visual Programming
The missing link in our project was the simulation algorithm. Acoustics are complicated and, in order to be assessed, they need complicated analysis and validation tests. However, the raytrace algorithm is appropriate for concept design purposes. Because we are concentrating on the geometry and in particular on reflectors design, the material property is not included.
Dynamo has its own raytrace, but it is limited because it is performed inside Revit and communication takes more time than it would in Dynamo, and it cannot be part of a loop. Due to those constraints we decided to implement a simple raytrace algorithm in Dynamo. Our first step was visual programming. Dynamo is makes it exceptionally easy to prototype algorithms. The main algorithm is:
- For each ray:
- start from a point source with a starting direction vector
- draw a line which intersects all the surfaces
- select the closest surface intersected
- calculate the normal at this point
- rotate the direction vector 180° around the normal direction
- reverse the vector
- update the start point which is now the new intersection
- repeat
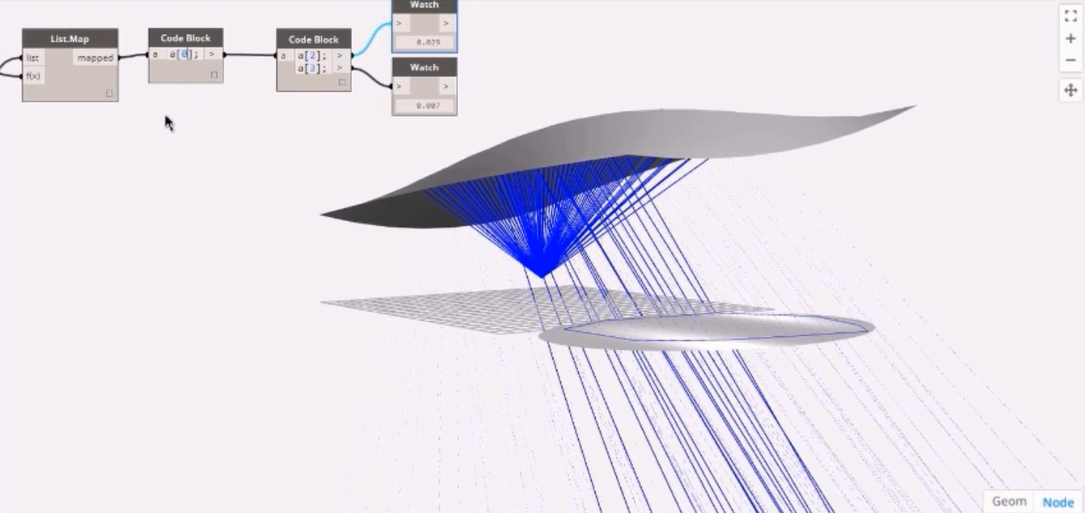
In the video the first two iterations are shown for a single ray, copying and pasting part of the script. This needs improvement but the prototype of a ray bounce is the actual code that can be translated in python, allowing multiple loops.
In order to implement the algorithm, we need a loop where we can generate the ray objects and update them for certain input geometry. For reflectors design we also need a target surface and a node that generates vectors pointing at this surface. This can be done with a little script that uses the u and v coordinates of the surface to get a point, then a vector by 2 points to generate the starting array of vectors.
The python analysis code is implemented with two classes: Ray and Raytrace.
Ray:


Ray class has a constructor that initializes the ray from an initial point and a starting vector. The update method performs the loop previously described. Until the maximum number of bounces is reached, it performs the intersections, reflections of the ray, and it stores the intersection points. The methods intersectionPoint and closestPointIndex are internal, which means they are functions called during the update method, in order to make it smaller and easier to debug. The method getPolycurve returns a polycurve passing throughout the points after the bounces are done.
Raytrace:

Raytrace class is easier in a way. It is initialized with the starting parameters, and an array of rays is initialized. The run method loops through the starting vectors and creates a new ray, updates the ray and adds it to the array field. The method getRaysAsPolycurve returns an array of polycurves, each one with the rays.
Main script:

The main script is really concise: generate the simulation object, run the simulation, and output the result.
In the Dynamo definition, the node pointAtDistance is useful to visualize the particle at a given time. As we know, the speed of the sound is about 343 m/s. So fixing a time in a slider we know the distance of the sound from the source, which corresponds to the pointAtDistance of the polyline, oriented in the sound generation direction.
Having defined those classes, our next step was to create a library, Acoustamo, using ZeroTouch library implementation.
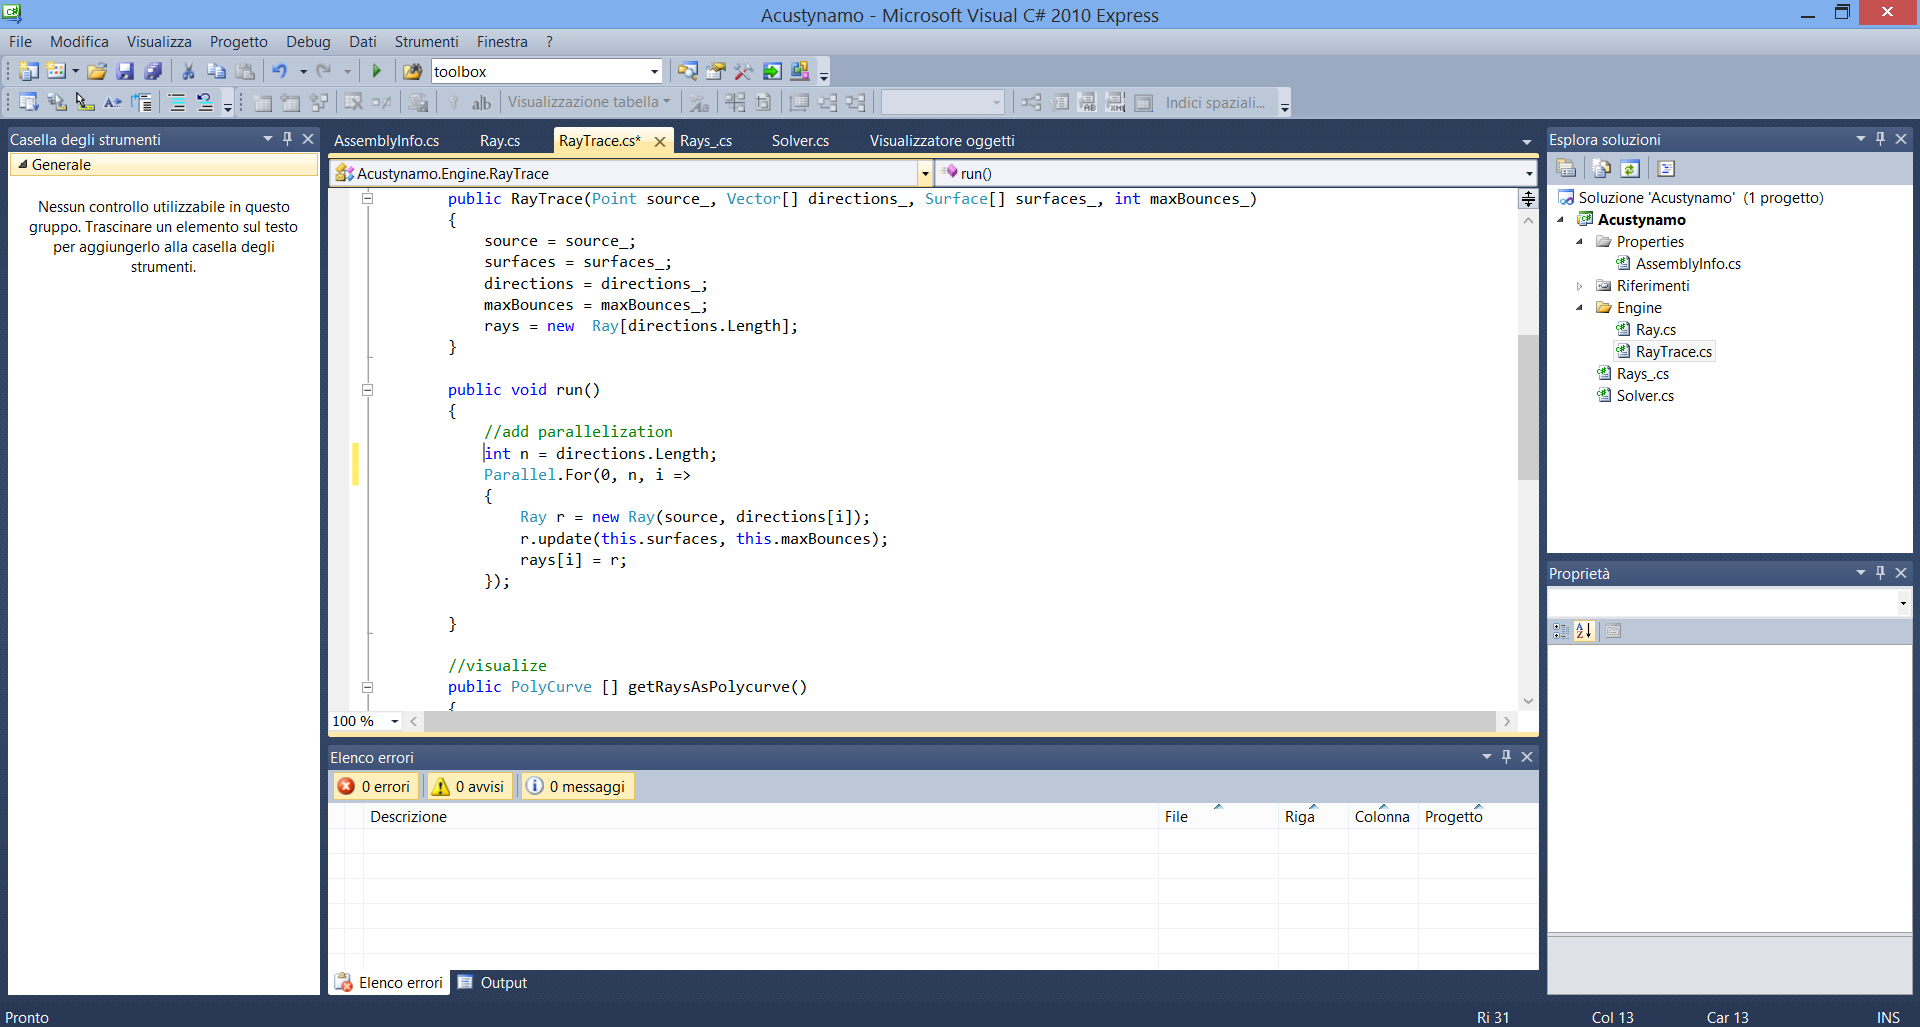
The c# code is actually the python code translated, with some correction necessary to adapt the variables plus an improvement. As the rays acts independently are the most demanding calculation, why not using parallel computing? So we did, changing the for loop inside the run method in the raytrace class. The result was amazing: in a i7 16GB ram, in order to perform the same analysis, a raytrace with 100 vectors and 20 bounces took 20 seconds in Python and 4 seconds in c# using multithread. Speed is important if we want to optimize the design and generate and evaluate many options quickly. Sometimes a sophisticated algorithm can be more precise as an analysis tool but not as optimization tool because the sophisticated calculation demands lots of memory and time, allowing less iteration for the same design problem within time constraints.
Optimo Optimization
Once we hacked and improved the simulation algorithm, we were ready for optimization! In order to do this we used Optimo, a Dynamo plugin from Mohammad Rahmani Asl which performs a Multicriteria Optimization with a genetic algorithm.
First, the project question: How would an optimized reflector be if we gave a sound source point and a target area that needs to be hit by the rays? So we modelled the elements in Dynamo: source point, curved canopy and an elliptic target area. Then we modelled the simulation inputs: initial directions, two bounces, two surfaces. The genotype, or, the parameters which controls the shape, is the z value of the point that is interpolated by NURBS generating the reflector. By changing the value of the points, we change the shape and the direction of the rays. Obviously we could move them manually and find a solution, but how long would it take? We’d prefer to just want to setup the machine, let the machine work and go to the bar.

(source: http://www.howtogeek.com/102420/geeks-versus-non-geeks-when-doing-repetitive-tasks-funny-chart/)
But now a question arises. How can we measure the performance of the algorithm? As we said previously, we want the rays to bounce into the target area, so we want to maximize the number of intersections into the target surface. Is this enough? No, we want them cover the maximum area of the target (which we can measure by calculating the convex hull of the intersection points and its area with the shoelace algorithm). So we have the performance indicator (2 fitness function in GA terms), and now we can evolve the design.
In order to make Optimo work, we had to pack our model and the simulation in a node that we call acousticProblem. We needed to leave out only the array of z parameters, our genotype. This node is then instantiated with the Optimo’s initial population node (NSGA_II.InitialSolutionList).
What the node does is essentially randomize the genotype (the z parameters) for the number of individuals within the population. Then the array includes the fitness functions at the end, which are initialized with 0.0 value for each individual (Of course! No analysis done yet!). The output is a 2D array of parameters:
| index 0 | [Individual 0] | [genotype] | |
| index 1 | [Individual 1] | [genotype] | |
| … | |||
| index (pop.size) | [Fitness 1] | [values for each individual] | |
| index (pop.size+1) | [Fitness 2] | [values for each individual] | |
After this we needed to instantiate each individual and run the analysis, removing the fitness row from the array and use the acousticProblem node without input, plugged into the List.Map node.

Initial population generated! Now we had to extract the fitness value from the outputs. A little notation about Optimo: The algorithm is a minimization algorithm, so as we want to maximize area and number of intersection, we have to reverse in some way the fitness. In this scenario, we decided to use the formula 1 / (x + 0.001) to reverse the algorithm into a maximization algorithm. The 0.001 value is added to avoid division by zero. Once the analysis node was added, we needed to assign the fitness value with the node NSGA_II.AssignFitnessFuncResults to the initial population, filling the part of the array which stores the fitness functions.
Now that we had a population instantiated, we then created the function that needs to be run to evolve it. We needed to duplicate the definition, pack this node and change the NSGA_II.InitialSolutionList node into NSGA_II.GenerationAlgorithm. After the fitness assignation node we needed to sort the population with the NSGA_II.Sorting node and add the result to the output. We also added a value to the output value to store the number of iteration that needs to be ingremented.
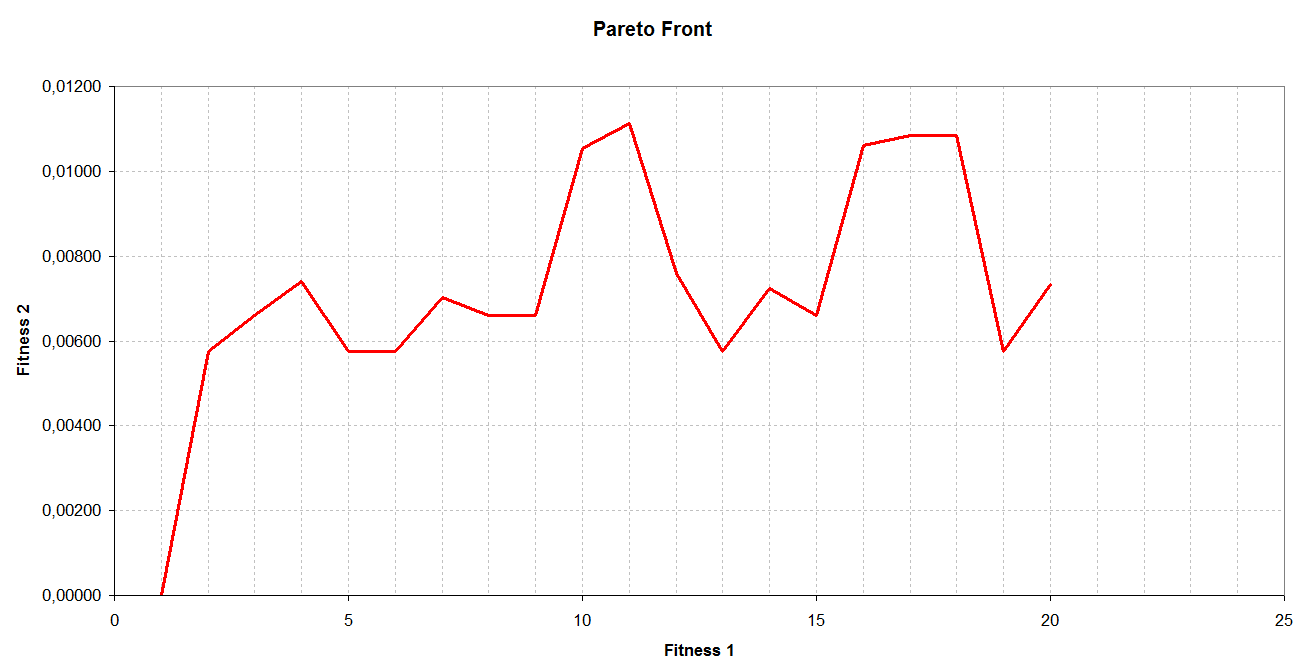
After some tests adjusting the population size and the number of iteration, we reached the convergence. This was particularly evident when we filtered the information in order to rebuild the best individual; looping trough the solution they all look similar. The shapes tend to be symmetrical (even if no symmetry constraint was added) and concave. This may be caused by the fact that the more angled rays tend to bounce outside the target area and they need to be directed to the spot. The Pareto front, plotted in 2D as we have two fitness functions, proves that the first two solutions were the best under both fitness examination. This may be due to the fact that the number of intersections and the area of the points are not directly related.
 |
 |
 |
 |
Conclusion and Further Work
With this little project for the Hackathon competition, hacking Dynamo, Optimo and a Raytrace algorithm, we designed a workflow to implement a simple simulation algorithm that can be used to optimize design projects at concept level. Our results showed a convergence of the algorithm, evident from the similarity of the optimized shapes and from the Pareto front diagram. Some attributes of the shapes (concavity, symmetry) may have been anticipated by an expert acoustician as design constraints, but in this case are a result of a bottom-up design where the machine, which has no experience of acoustics, decides which shapes works best and evolve the solution.
This is all good, but more work needs to be done. Time constraints did not allow us to run a large problem with a big population and multiple iterations. But that is a test worth doing. Other work may be done on the algorithm, such as including the material properties, enabling more analysis such as statistical reverberation of the acoustic space, or constraining the simulation for a defined frequency input band. This will extend Acoustamo to analyse and, thanks to Optimo, optimize, concept design for acoustics.
We really enjoyed this competition and we hope that this work can be useful and hacked soon.
About the Project Team
Andrea Vannini
Andrea Vannini is an expert in computational design. He received his MArch in Rome (Italy) at La Sapienza University and his MSc in Adaptive Architecture and Computation at University College London. His thesis was in the field of parametric modelling and optimization using artificial intelligence algorithms. He worked at Flanagan Lawrence as an architect, implementing BIM and parametric design in many projects, working together with the BIM manager.
andrea.vannini.arc@gmail.com
http://www.linkedin.com/pub/andrea-vannini/32/3a8/633
Michael Hudson
Michael is a British Architect and University Lecturer. A graduate of The University of Nottingham, he has 12 years of experience with BIM software. He is currently an Associate at Flanagan Lawrence in London, UK and leads their BIM team. During his career, Michael’s expertise in 3D design has seen him work on schemes ranging in size from temporary installations to a 13km2 Masterplan. Michael also leads a design studio at Leicester De Montfort University.
Mikehudsonarchi@gmail.com
www.uk.linkedin.com/in/mikehudsonarchi
@MikeHudsonArchi